728x90

SEO의 기본 세팅은 다음과 같이 설정한다.

  1. 페이지마다 캐노니컬 태그를 설정
    <!DOCTYPE html>
    <html>
    <head>
      <link rel="canonical" href="https://example.com/page.php" />
    </head>
    <body>
    ...
    </body>
    </html>
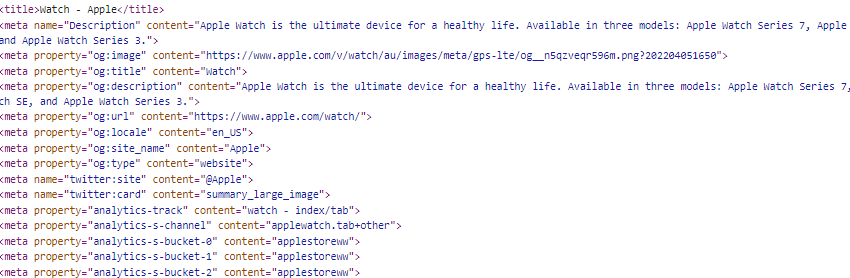
  2. 태그와 메타 설정
    이미지 태그에 alt, head에 메타데이터, title은 페이지마다 달라야 하며 link에 alt도 붙여야한다.
    apple.com은 SEO를 위해 다음과 같이 meta tag를 설정해 놓았다
    - apple home(www.apple.com)

    - apple watch(www.apple.com/watch)
  3. 페이지 속도 개선
    PageSpeedInsights에서 웹페이지 속도 개선에 대해 리포팅을 받아볼 수 있다.
  4. 구조화
    HTML5의 tag들이 sementic 하게 맞춰 설계되어야한다. https://search.google.com/test/rich-results
  5. 사이트맵의 정기적인 관리
     사이트맵을 주기적으로 갱신한다.


Vue 프로젝트를 google SEO에 등록하기 위해서는 크게 2가지 방법이 있다.

  1. vue-meta 이용하여 페이지별 meta tag 작성
  2. prerender-spa-plugin 이용하여 SSR 페이지 만들기 

첫번째 방법이 보다 편하므로 페이지별 meta tag를 이용하여 Vue 프로젝트의 SEO를 구현토록하자.


  1. vue-meta 라이브러리를 프로젝트에 설치한다.
    현시점 vue3에 적용가능한 vue-meta 라이브러리는 3.0.0-alpha.10 까지 나와있다
    npm i --save vue-meta@alpha
  2. vue가 vue-meta 플러그인을 사용할 수 있도록 해당 플러그인 라이브러리를 등록한다
    //main.ts
    import { createApp } from 'vue';
    import { createMetaManager } from 'vue-meta';
    import App from './App.vue';
    
    app
      .use(createMetaManager())
      .mount('#app');
  3. default meta tag를 설정한다
    - index.html 설정
    og란: open graph의 약자로  어떤 HTML 문서의 메타정보를 쉽게 표기하기 위해서 메타정보에 해당하는 제목, 설명, 문서타입, 대표 URL등을  정의할 수 있게해주는 프로토콜.
    <!DOCTYPE html>
    <html lang="en">
      <head>
        <meta charset="utf-8">
        <meta http-equiv="X-UA-Compatible" content="IE=edge">
        <meta name="viewport" content="width=device-width,initial-scale=1.0">
        <meta name="robots" content="ALL">
        <link rel="icon" href="<%= BASE_URL %>favicon.ico">
        <title>식물의언어 : 식집사를 위한 식물 정보 플랫폼</title>
    
        <!--og, meta-->
        <!--기본적으로 웹에 설정해줘야하는 og 메타태그 및 Naver 블로그, 카카오톡 미리보기 설정-->
        <meta property="og:type" content="website">
        <!-- <meta property="og:url" content="https://www.plantslang.com/"> -->
        <meta id="meta_og_title" property="og:title" content="식물의언어">
        <meta id="meta_og_image" property="og:image" content="opengraph.webp">
        <!-- <meta property="og:description" content="식집사를 위한 식물 정보 플랫폼, 식물의언어를 찾아오세요"> -->
        <meta property="og:site_name" content="식물의언어">
        <meta property="og:locale" content="ko_KR">
        <meta property="og:width" content="1200">
        <meta property="og:height" content="630">
    
    
        <!-- <meta name="description" content="식집사를 위한 식물 정보 플랫폼, 식물의언어를 찾아오세요"> -->
        <!-- <meta name="keywords" content="식물의언어, 식물의언어, 식물, plantslang"> -->
    
        <!--phone 설정-->
        <meta name="theme-color" content="#365650">
        <meta name="msapplication-navbutton-color" content="#365650">
        <meta name="apple-mobile-web-app-status-bar-style" content="black-translucent">
        <meta name="application-name" content="식물의언어">
        <meta name="msapplication-tooltip" content="식물의언어">
        
    
      </head>
      <body>
        <noscript>
          <strong>We're sorry but <%= htmlWebpackPlugin.options.title %> doesn't work properly without JavaScript enabled. Please enable it to continue.</strong>
        </noscript>
        <div id="app"></div>
        <!-- built files will be auto injected -->
      </body>
    </html>

    만약 description의 주석처리를 해제한다면 뒤에 vue-meta로 설정한 description과 중복이 발생하게 된다.
    중복이 발생하면 두개의 description을 이어 붙인다. 즉, 모든 페이지 별로 description이 중복되는 현상이 발생된다.
    https://www.searchenginejournal.com/google-on-how-it-handles-extra-meta-descriptions-and-title-tags/368600/#close
  4. 페이지(route)별 meta tag를 설정한다.

'VueJS' 카테고리의 다른 글

VueJS 3.0 form validating  (0) 2022.01.08
Vue Authentication  (0) 2022.01.08
AWS 에 Jenkins와 Nginx 이용하여 vue project 올리기  (0) 2022.01.02
Vue 3 - 5. Props With Types  (0) 2021.12.28
Vue3 - 4.Custom type의 데이터  (0) 2021.12.28
728x90
//package.json
{
  "name": "polz-blog",
  "private": true,
  "version": "0.0.0",
  "scripts": {
    ...,
    "lint": "npx eslint \"**/*.{ts,tsx}\"",
    "lint:fix": "eslint --fix \"**/*.{ts,tsx}\"",
    "lint-staged": "lint-staged",
    "prepare": "husky install"
  },
  "dependencies": {
    ...
  },
  "devDependencies": {
    ...
    "@typescript-eslint/eslint-plugin": "^5.19.0",
    "@typescript-eslint/parser": "^5.19.0",
    "eslint": "^8.2.0",
    "eslint-config-airbnb": "^19.0.4",
    "eslint-config-prettier": "^8.5.0",
    "eslint-import-resolver-typescript": "^2.7.1",
    "eslint-plugin-import": "^2.25.3",
    "eslint-plugin-jsx-a11y": "^6.5.1",
    "eslint-plugin-prettier": "^4.0.0",
    "eslint-plugin-react": "^7.28.0",
    "eslint-plugin-react-hooks": "^4.3.0",
    "husky": "^7.0.0",
    "lint-staged": "^12.3.7",
    "prettier": "^2.6.2",
  	...
  },
  "lint-staged": {
    "*.{ts,tsx,js,jsx}": [
      "npm run lint:fix"
    ]
  }
}

//.husky/pre-commit
#!/bin/sh
. "$(dirname "$0")/_/husky.sh"

npm run lint-staged

husky init

husky install

//tsconfig.json
{
  "compilerOptions": {
    "target": "ESNext",
    "useDefineForClassFields": true,
    "lib": ["DOM", "DOM.Iterable", "ESNext"],
    "allowJs": false,
    "skipLibCheck": false,
    "esModuleInterop": false,
    "allowSyntheticDefaultImports": true,
    "strict": true,
    "forceConsistentCasingInFileNames": true,
    "module": "ESNext",
    "moduleResolution": "Node",
    "resolveJsonModule": true,
    "isolatedModules": true,
    "noEmit": true,
    "jsx": "react-jsx",
    "baseUrl": "./",
    "paths": {
      "@/*": ["src/*"], // 사용할 경로
    },
  },
  "include": ["src/**/*.ts", "src/**/*.tsx"],
  "references": [{ "path": "./tsconfig.node.json" }]
}
//.eslintrc.js
module.exports = {
    "env": {
        "browser": true,
        "es2021": true
    },
    "extends": [
        "plugin:react/recommended",
        "airbnb",
        'prettier'
    ],
    "parser": "@typescript-eslint/parser",
    "parserOptions": {
        "ecmaFeatures": {
            "jsx": true
        },
        "ecmaVersion": "latest",
        "sourceType": "module"
    },
    "plugins": [
        "react",
        "@typescript-eslint",
        "prettier"
    ],
    "rules": {
        /*tsx에서 jsx 문법을 가능하게 해준다*/
        "react/jsx-filename-extension":["warn",{"extensions":[".tsx"]} ],
        /*ts tsx 확장자를 안써도 되게해준다. 해당파일이름의 ts|tsx파일을 찾아 자동 import한다*/
        "import/extensions":[
            "error",
            "ignorePackages",
            {
              "ts":"never",
              "tsx":"never"
            }
        ],
         'prettier/prettier': 'error',
    },
    /*tsconfig 설정을 가져온다*/
    "settings":{
        "import/resolver":{
          "typescript":{}
        }
      }
}

'React' 카테고리의 다른 글

Redux toolkit - extraReducers(2) - redux thunk  (0) 2022.05.15
Redux toolkit - extraReducers(1) - module  (0) 2022.05.15
Redux toolkit - Redux toolkit 기본  (0) 2022.05.15
Redux toolkit - redux 기본  (0) 2022.05.15
React 18 변경 사항  (0) 2022.04.11
728x90


17에 비해 코드상으로 수정해야할 부분이 많지는 않다는 것이 다행이다. React18은 React 17에서 어떤점이 바꼈는지 알아보자

    1.  html과 js를 연결해주는 main.js안에서 사용하는 함수가 바꼈다.
      import ReactDOM from 'react-dom'
      import App from './App'
      
      //17
      //ReactDOM.render(<App />, document.getElementById('root'));
      
      //18
      const root = ReactDOM.createRoot(document.getElementById('root'));
      root.render(<App />);
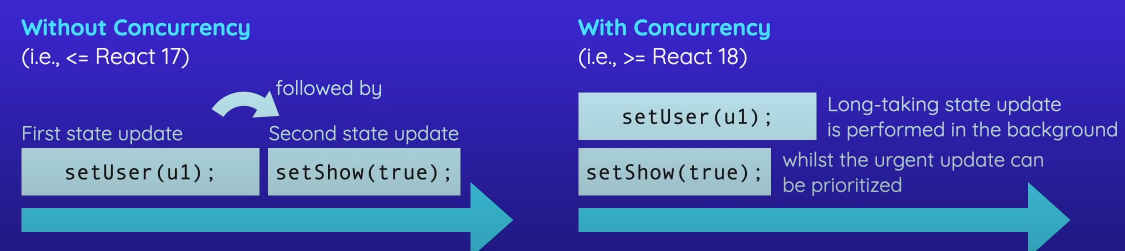
    2. Concurrent Rendering
      동시에 일어난 다수의 상태 업데이트 처리하는 기법으로 urgent한 update는 오래 걸리거나 급박하지않은 update보다 우선되어진다.
      만약 엄청나게 많은 component가 동시에 변해야하는 상황이라면 
      React 17에서는 동시에 state 변화가 일어난다고 해도 먼저 일어난 것 순서대로 순차적으로 처리되는 반면
      React 18에서는 동시에 state 변화가 일어나야할 시 우선도를 보고 urgent한 update가 우선되어지고 urgent하지 않거나 오래걸리는 update는 background에서 수행된다.

      우선도 구분은 다음 API를 사용하여 우선도가 높은 상태변화와 낮은 상태변화를 구분한다. 
      - useTransition( )
      - startTransition( )
      - useDeferredValue( )

      useTransition startTransition useDefferedValue
      React에게 lower priority의  state update를 알려준다 - React에게 갱신된 값이 준비될때까지 이전값을 UI상 display 해야한다는 것을 알려준다
      - 2개의 value 중 하나는 업데이트가 빠르고 나머지 하나는 업데이트가 느린경우 느린 업데이트의 value에 대해서는 update전 값을 보여준다.
      함수형 컴포넌트에서 사용한다 hook이 사용될 수 없는 환경에서 사용한다
      [isPending, startTransition] 반환
      //isPending은 현재 background에서 state가 변화하고 있음을 알려준다
       
      startTransition(()=>setUser(user)); const deferredVal=useDeferredValue(value);
      import { useTransition } from 'react';
          
      const [isPending, startTransition] = useTransition();
      // Urgent
      setInputValue(input);
      
      // Mark any state updates inside as transitions
      startTransition(() => {
        // Transition
        setSearchQuery(input);
      })
      {isPending && <Spinner />}
      import { useState, useDeferredValue } from "react";
          
      function App() {
        const [input, setInput] = useState("");
        const deferredValue = useDeferredValue(text, { timeoutMs: 3000 }); 
      
        return (
          <div>
            <input value={input} onChange={handleChange} />
            <MyList text={deferredValue} />
          </div>
        );
       }
    3. State Batching 개선
      State Batching: 다수의 state 업데이트가 함께 실행된다. 그러므로 컴포넌트가 한번만 업데이트된다.
      function increaseCouterHandler() {
        //Two state update calls batched together
        // +3 씩 이뤄진다
        setCounter((curCounter)=>curCounter+1);
        setCounter((curCounter)=>curCounter+2);
      }
      
      function increaseCouterAsyncHandler() {
        setTimeout(()=>{
          //Two state update calls not batched when using react 17
          //+3 씩 이뤄지는데 오직 asynchronous 환경에서만 이뤄졌다
          setCounter((curCounter)=>curCounter+1);
          setCounter((curCounter)=>curCounter+2);
        })
      }
    4. Suspense 개선
      Suspense: Code(or data) fetching과 관련된 UI updates를 도와주는 component. 주로 lazy loading할때 사용한다.
      React 18에서는 Server side rendering 환경에서도 Suspense를 사용할 수 있다.
728x90

src폴더 내 불필요한 파일들을 싹 지운다.


blog template 은 https://www.figma.com/file/NVMJZa2R2iULZ92VeJ5nMJ/%F0%9F%8C%8E-Free-Blog-Template-Design-(Community)?node-id=118%3A1909 의 템플릿을 사용하도록 한다.


woff font 만들기 

먼저 위 템플릿의 font는 전부 PlusJakartaSans font family를 사용중에 있다.

woff 파일들의 로컬설치를 위해 먼저 PlusJakartaSans otf파일을 설치 받았다. (OTF에 비해 WOFF가 압축률이 높은 이득이 있다.)

이후 웹에서 woff로의 변환을 하였다. 그러면 woff와 woff2가 생성이 된다.

woff2는 woff의 차세대 버전으로 압축률이 높은 장점이 있지만 woff에 비해 브라우저 호환률이 떨어진다는 단점이 있다.

font 파일 형식에 따른 호환되는 브라우저

font 적용하기

assets 폴더안에 다음과 같이 font전용 폴더를 생성해준다.

stylesheet.css에서는 위의 font를 import하여 브라우저에서 해당 font가 사용될 수 있도록 설정한다.

/* stylesheet.css */
@font-face {
    font-family: 'Plus Jakarta Sans';
    src: url('./woff2/plusjakartadisplay-bold-webfont.woff2') format('woff2'),
         url('./woff/plusjakartadisplay-bold-webfont.woff') format('woff');
    font-weight: normal;
    font-style: normal;
}

@font-face {
    font-family: 'Plus Jakarta Sans';
    src: url('./woff2/plusjakartadisplay-bolditalic-webfont.woff2') format('woff2'),
         url('./woff/plusjakartadisplay-bolditalic-webfont.woff') format('woff');
    font-weight: normal;
    font-style: normal;

}

@font-face {
    font-family: 'Plus Jakarta Sans';
    src: url('./woff2/plusjakartadisplay-italic-webfont.woff2') format('woff2'),
         url('./woff/plusjakartadisplay-italic-webfont.woff') format('woff');
    font-weight: normal;
    font-style: normal;
}

@font-face {
    font-family: 'Plus Jakarta Sans';
    src: url('./woff2/plusjakartadisplay-light-webfont.woff2') format('woff2'),
         url('./woff/plusjakartadisplay-light-webfont.woff') format('woff');
    font-weight: normal;
    font-style: normal;
}

...

이 stylesheet를 해당 font를 사용할 js또는 css 에 import하면 Plus Jakarta Sans local로 import한 font를 사용할 수 있다. (위의 상황에서는 overloading으로 마지막에 import한 font가 Plus Jakarta Sans로 적용된다.)

728x90

기본적인 React Application 을 실행시키기 위해서는 다음과 같은 프로세스를 실행한다.

nodejs설치 -> npm install -> npm run build -> server 실행

이러한 일련의 과정을 Docker 는 이미지로 생성해 순서대로 처리할 수 있다.

그리고 이런 이미지 설정파일을 Dockerfile에서 정의한다.

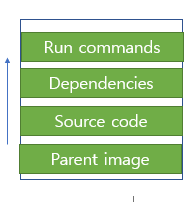
Dockerfile의 생김새는 다음과 같다.

# parent image
FROM node:17-alpine as build-stage

# Run Command (ex. COPY, npm install, ...)이 작업되는 directory 선언
WORKDIR /app

# all source code copy , COPY <src> <dest>
COPY . .

# dependencies
RUN npm install

# container가 어떤 포트를 사용할지 선언한다. app.js에서 4000포트 사용중이므로 4000포트를 expose 한다.
EXPOSE 4000

# 다음 명령어가 안되는 이유: image는 container의 blueprint이지 application을 실행하는 곳이 아니다. container는 image의 running instance이다.
#RUN node app.js

# container가 RUN을 시작한 후 서버가 작동하게 하기 위해서 다음과 같이 CMD 명령어를 쓴다.
CMD ["node", "app.js"]

# 빌드하는 명령어 myapp: image 이름, . : dockerfile build하는 장소로부터의 상대 경로
#docker build -t myapp .

parent image 설정 -> work directory 설정 -> work directory에 source code 복사 -> package dependency 설치 -> 포트 설정 -> 서버 실행

의 순서대로 설정된다.

여기서 주의해야할 것이 2가지가 있다.

  1. WORKDIR
    • 작업이 이뤄지는 경로로서 WORKDIR이 선언된 이후 모든 작업은 선언된 directory에서만 이뤄진다.
  2. EXPOSE
    • 호스트와 연결할 포트 번호 설정.
    • db: 
        image: mysql:latest 
        expose: 
          - "3306" 
      
      node: 
        image: node:latest
      위의 경우 node는 mysql에 3306포트로 접근할 수 있다.
  3. RUN vs CMD
    • 두 명령어 모두 Command를 실행시켜주는 명령어이다.
      하지만 RUN은 image를 구성하는데 사용하는 명령어로 image는 container의 blueprint이지 application을 실행하는 역할이 아니다. 왜냐하면 container는 image의 running instance이기 때문이다.
      CMD는 모든 image구성이 끝난 후 실행할 Command를 실행시켜주기 위해 사용한다.
728x90

Docker Image

container의 설계. Application이 작동하기 위해서 필요한 요소들을 의미한다.

Image 구성

  • Parent Image : OS 또는 runtime environment 를 의미 (ex. node, python, jdk...)
    • docker hub에서 parent image를 찾을 수 있다.


Docker Container

여러 이미지들을 소유한 실행가능한 인스턴스. Application을 실행시켜준다.
즉, Image들이 실행되면 Container가 생성되면서 application이 동작한다.
하나의 독립적인 process라 보면 편하다

작동 원리 

  • 같은 구성의 이미지를 가진 Container는 모두 같은 방식으로 작동한다.
  • Server에 어떤 환경이 구성되어 있던지 Container는 Image의 환경을 따라간다. (Isolated)
728x90

Story 작성하기

Storybook은 Story를 모아놓은 집합체가 되고, 각각의 Story는 저마다의 Vision State를 가지고 있는 Component를 의미한다. ex) primary button, secondary button, large button, small button , ...


하나의 Story를 만들기 위해 필요한 파일은 다음과 같다. 

  • component가 정의되어 있는 파일. ex) button.js(x)
  • style가 정의되어 있는 파일. ex) button.css
  • story가 정의되어 있는 파일. ex) button.stories.js

위 파일들은 하나의 폴더에 모여있어야한다.


다음과 같이 Button component와 style이 정의되어 있다고 가정하자

import React from 'react'
import './Button.css'

function Button(props) {
  const {variant = 'primary', children, ...rest} = props;
  return (
    <button className={`button ${variant}} `} {...rest}>{children}</button>
  )
}

export default Button
.button{
  border: none;
  color: white;
  padding: 15px 32px;
  text-align: center;
  text-decoration: none;
  display: inline-block;
  font-size: 16px;
  border-radius: 4px;
  cursor: pointer;
}

.primary {background-color: #008CBA;}
.secondary {background-color: #e7e7e7; color: black};
.success { background-color: #4CAF50;}
.danger {background-color: #f44336;}

총 4개의 디자인의 Button Story가 생성될 수 있다.

import React from 'react';
import Button from './Button';

export default{
  title: 'Button',// 필수, 전체 프로젝트에서 Unique해야한다.
  component: Button,
}

export const Primary = () => <Button variant='primary'>Primary</Button>
export const Secondary = () => <Button variant='secondary'>Secondary</Button>
export const Success = () => <Button variant='success'>Success</Button>
export const Danger = () => <Button variant='danger'>Danger</Button>

//Primary.storyName = 'Primary Button' // story를 rename 할 수 있다.

(npm run storybook을 하면 .storybook/main.js의 stories경로를 보고 해당하는 story 파일들을 읽어 보여준다.)

이같이 독립적으로 component의 디자인이 어떻게 될지 알 수 있다.

협업에서 굉장히 유용하다.

Story 안에 Story 넣기

다음과 같이 Input component도 추가 되었다고 가정하자.

import React from 'react'
import './Input.css';

function Input(props) {
  const {size='medium',...rest} = props;
  return (
    <input className={`input ${size}`} {...rest} />
  )
}

export default Input
.input{
  display: block;
  width:400px;
  padding-left:1rem;
  padding-right:1rem;
  border-radius: 0.25rem;
  border: 1px solid;
  border-color: inherit;
  background-color: #fff;
}

.small{
  height:2rem;
  font-size:0.875rem;
}

.medium{
  height:2.5rem;
  font-size:1rem;
}

.large{
  height:3rem;
  font-size:1.25rem;
}

primary button과 large input을 조합한 component를 subscription이란 이름의 story로 만들고 싶다. 이 때 다음과 같이 Subscription.stories.js를 작성하면된다.

import React from 'react';
import {Primary} from '../Button/Button.stories';
import {Large } from '../Button/Input.stories';

export default{
  title:'Form/Subcription' // Form directory 안에 생성됨
}

export const PrimarySubscription = () =>{
  <>
    <Large/>
    <Primary/>
  </>
}

args를 이용하여 story 만들기

지금까지 우리는 story를 만들때 개별적으로 import 한 component에 props를 넣어주면서 만들었다. 하지만 이 방법보다 storybook의 args속성을 이용하여 props를 설정하는 것이 좀 더 좋은 방법이다.

그 이유는 다음과 같다.

  1. props를 object로 표현하여 넘겨주는 것이 jsx element형식보다 더 적절하다
  2. 복잡한 component가 만들어 지는 상황에서 써야할 코드의 양을 줄일 수 있다.
  3. args는 다른 story에 재사용이 가능하다.
import React from 'react';
import Button from './Button';

export default{
  title: 'Form/Button',
  component: Button,
  // args:{
  //   children:'Button' // default 설정 가능
  // }
}

// export const Primary = () => <Button variant='primary'>Primary</Button>
// export const Secondary = () => <Button variant='secondary'>Secondary</Button>
// export const Success = () => <Button variant='success'>Success</Button>
// export const Danger = () => <Button variant='danger'>Danger</Button>

const Template = args => <Button {...args}/>

export const Primary = Template.bind({})
Primary.args={
  variant:'primary',
  children:'Primary Args'
}

export const LongPrimary = Template.bind({})
LongPrimary.args={
  ...Primary.args,
  children:'Long Primary Args'
}


Decorator

storybook web에서 보여지는 일괄적인 style을 적용하고 싶을 수 있다. 이때 사용하는 것이 Decorator이다.

Button을 가운데 정열하는 Decorator 파일은 다음과 같이 작성할 수 있다.

// utility component -> decorator
import React from 'react'
import './Center.css';

function Center(props) {
  return (
    <div className="center">{
      props.children
    }</div>
  )
}

export default Center
.center{
  display:flex;
  justify-content: center;
}

이후 Button story에 일괄적인 Center style를 적용하면 된다. 이 때 사용하는 것이 decorator 설정이다

import React from 'react';
import Button from './Button';
import Center from '../Center/Center'
export default{
  title: 'Form/Button',
  component: Button,
  decorators:[story => <Center>{story()}</Center>]
}

const Template = args => <Button {...args}/>

export const Primary = Template.bind({})
Primary.args={
  variant:'primary',
  children:'Primary Args'
}

export const LongPrimary = Template.bind({})
LongPrimary.args={
  ...Primary.args,
  children:'Long Primary Args'
}

결과는 다음과 같이 가운데 정렬이 된다.

모든 storybook에 일괄적인 decorator을 적용하고 싶다면 global decorator을 사용한다. preview.js에서 설정할 수 있다.

import React from 'react';
import {addDecorator} from '@storybook/react';
import Center from '../src/components/Center/Center'

addDecorator(story=><Center>{story()}</Center>)
728x90

Storybook 이란?

  • UI component를 위한 개발 환경과 Playground
  • 컴포넌트를 독립적으로 생성해준다.
  • 격리된 개발 환경에서 이러한 컴포넌트를 대화식으로 보여준다. => react 어플리케이션의 외부에서 돌아간다.
    • 개발된 컴포넌트들이 어떻게 다른 Props를 가지는지 보여준다.
    • 동적으로 Props나 Accessibility score를 바꿔준다.

Storybook 시작하기

  1. npx create-react-app react-story-v6
  2. npx sb init => Add Storybook
    - npm run storybook / npm build-storybook : development mode에서 storybook 실행/ storybook 빌드
    - main.js : storybook의 configuration file
    - preview.js : 내가 작성한 story의 configuration file
    - stories/~.stories.mdx: storybook의 landing page
    - stories/~.js : component
    - stories/~.stories : component와 연관이 있는 story를 모아놓은 파일. story를 export 한다.
  3. npm run storybook : component의 landing page들을 볼 수 있다.

+ Recent posts